
-
Introduction
-
Types of HTML Tags
-
HTML Document & It's different Sections
-
Requirement of HTML
-
Basic tags used in any HTML document
-
Heading Tag
-
Line Break Tag & Section Separator Tag
-
Paragraph, Bold, Italic & Underline Tag
-
Big, Small, Marquee, Subscript & Superscript Tag
-
Teletype & Strike Tag
-
Tag Attribute with Examples
-
Font Tag
-
Table Tag
-
List Tag (OL, UL & DL Tag)
-
Form Tag
-
Image Tag
-
HTML 5 Input Types
-
DHTML
-
XML

HTML
FORM
• HTML forms are required when we want to collect some data from the site visitor.
• For example, during user registration we should like to collect information such as name, email address,etc.
• A form will take input from the site visitor and then will post it to a back-end application such as; CGI, PHP, etc.
• The back-end application will perform required processing on the passed data.
• There are various form elements available like textfield, textArea, dropdown menu, radioButton, checkbox, etc.
• The HTML <form> tag is used to create an HTML form.
• Syntax:-
<form action= "Script URL" method= "GET/POST">
form elements
</form>
• form attribute:-
1. Action:-
It is the backe-end script ready to process the users passed data.
2. Methods:-
This attribute is used to upload data. the most frequently used methods are GET & POST.
HTML FORM ELEMENTS
• There are different types of form control that we can use to collect data using HTML form:-
1. Text input control
2. Check box control
3. Radio box control
4. Select box control
5. File select control
Text input control
• There are 3 types of text input control used on form:-
I. Single line text input control
II. Password input control
III. Multiline text input control
Single line text input control
• This control is used for items that require only one line of user input, such as search boxes or name.
• They are created by using HTML <input> tag.
• Example:-
<html>
<head>
<title> TEXT INPUT CONTROL </title>
</head>
<body>
<form>
FIRST NAME: <input type="text" name="first_name"/> <br>
LAST NAME: <input type="text" name="last_name" />
</form>
</body>
</html>
OUTPUT:

• Attributes:-
1. Type:-
It indicates the type of input control.
2. Name:-
It is used to give a name to the control which is sent to the server to be recognized and get the value.
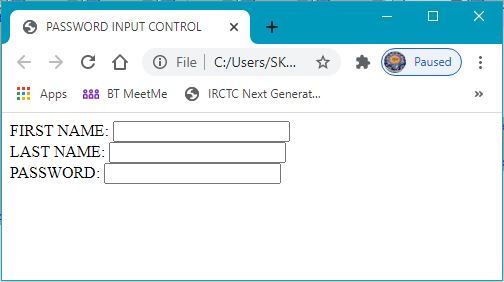
Password input control
• This is also a single line text input control but it masks the character as soon as a user enters it.
• They are also created by using HTML <input> tag.
• Example:-
<html>
<head>
<title> PASSWORD INPUT CONTROL </title>
</head>
<body>
<form>
FIRST NAME: <input type="text" name="first_name"/> <br>
LAST NAME: <input type="text" name="last_name" /> <br>
PASSWORD: <input type="password" name="password" />
</form>
</body>
</html>
OUTPUT:
• Attributes:-
1. Type:-
It indicates the type of input control.
2. Name:-
It is used to give a name to the control which is sent to the server to be recognized and get the value.
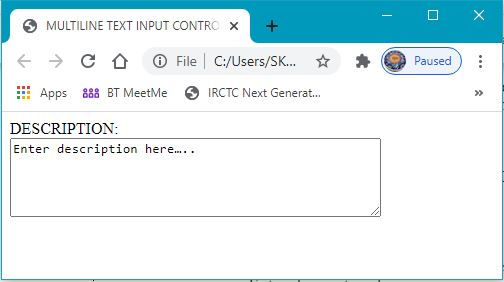
Multiline text input control
• This is used when the user is required to give details that may be longer than a single sentence.
• Multiline text input controls are created by using HTML <textarea> tag.
• Example:-
<html>
<head>
<title> MULTILINE TEXT INPUT CONTROL </title>
</head>
<body>
<form>
DESCRIPTION:<br>
<textarea rows="5" cols="50" name="description" >
Enter description here…..
</textarea>
</form>
</body>
</html>
OUTPUT:
• Attributes:-
1. Name:-
It is used to give a name to the control which is sent to the server to be recognized and get the value.
2. Rows:-
It indicates the number of rows of the text area box.
3. Cols:-
It indicates the number of columns of the text area box.
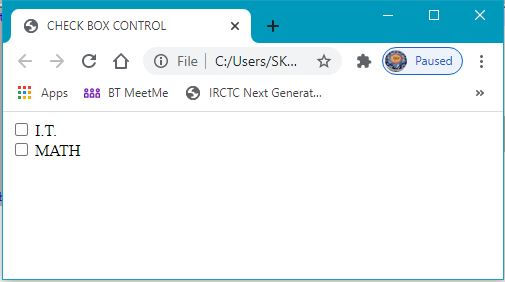
Checkbox control
• Check boxes are used when more than one option is required to be selected.
• They are also created by using HTML <input> tag but “type” attribute is set to checkbox.
• Example:-
<html>
<head>
<title> CHECK BOX CONTROL </title>
</head>
<body>
<form>
<input type="checkbox" name="I.T." value="I.T." /> I.T. <br>
<input type="checkbox" name="MATH" value="MATH" /> MATH
</form>
</body>
</html>
OUTPUT:
• Attribute:-
1. Type:-
It indicates the type of input control.
2. Name:-
It is used to give a name to the control which is sent to the server to be recognized and get the value.
3. Value:-
The value that will be used if the check box is selected.
4. Checked:-
Set to be checked if we want to select it by default.
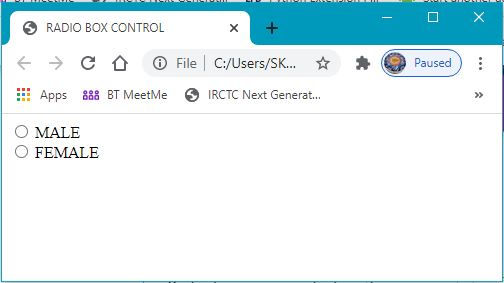
Radio box control
• Radio boxes are used when the user wants to select only one option at a time.
• They are also created by using HTML <input> tag but type attribute is set to “radio”.
• Example:-
<html>
<head>
<title> RADIO BOX CONTROL </title>
</head>
<body>
<form>
<input type="radio" name="gender" value="MALE" /> MALE <br>
<input type="radio" name="gender" value="FEMALE" /> FEMALE
</form>
</body>
</html>
OUTPUT:
• Attributes:-
1. Type:-
It indicates the type of input control.
2. Name:-
It is used to give a name to the control which is sent to the server to be recognized and get the value.
3. Value:-
The value that will be used if the radio box is selected.
4. Checked:-
Set to be checked if we want to select it by default.
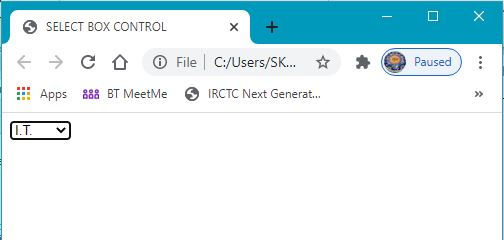
Select box control
• A select box also called as dropdown box.
• A select box , which provides option to list down various options in the form of dropdown list , from where a user can select one or more option.
• Example:-
<html>
<head>
<title> SELECT BOX CONTROL </title>
</head>
<body>
<form>
<select name="dropdown">
<option value="I.T." selected> I.T. </option>
<option value="MATH" > MATH </option>
</select>
</form>
</body>
</html>
OUTPUT:
• To select multiple options from select box we have to make the use of control key (ctrl) of the keyboard during the selection.
• Attributes of select tag:-
1. Value:-
Used to give a name to the control which is sent to the server to be recognized and get the value.
2. Size:-
This can be used to present a scrolling list box.
3. Multiple:-
If set to “multiple” then allows a user to select multiple items from the menu.
• Attributes of option tag:-
1. Value:-
The value that will be used if an option in the select box is selected.
2. Selected:-
Specifies that his option should be the initially selected value when the page loads.
File select boxes
• This control include submit button, reset button and client side button.
• Example:-
<html>
<head>
<title> FILE SELECT BOX </title>
</head>
<body>
<form>
<input type="submit" name="submit" value="submit" />
<input type="reset" name="reset" value="reset" />
<input type="button" name="ok" value="ok" />
</form>
</body>
</html>
OUTPUT:

How to make a simple registration form in a Web Page?
Related Topics
-
Introduction
-
Types of HTML Tags
-
HTML Document & It's different Sections
-
Requirement of HTML
-
Basic tags used in any HTML document
-
Heading Tag
-
Line Break Tag & Section Separator Tag
-
Paragraph, Bold, Italic & Underline Tag
-
Big, Small, Marquee, Subscript & Superscript Tag
-
Teletype & Strike Tag
-
Tag Attribute with Examples
-
Font Tag
-
Table Tag
-
List Tag (OL, UL & DL Tag)
-
Form Tag
-
Image Tag
-
HTML 5 Input Types
-
DHTML
-
XML